
Log in, Write, Publish it Online!
So you want to start a website or a weblog (blog) but you don’t know where to start? Or maybe you already have a Bluehost account and you’re looking for specific advice on a WordPress blog. This page shows every step of the software installation from the point of view of BlueHost’s CPanel (hosting account login) screen. With a few clicks and a few settings, pre-installed Fantastico scripts can install your website. Even if you’ve never made a website before, this can be finished in about ten minutes.
Once you log in, you’ll notice that the WordPress interface is really just a browser-based word processor with a lot of internet related options. A great way to learn the subtle features and powerful settings is to get hands-on experience and trust Google to find answers to the questions and problems that come up along the way.
In 10 min., you could set up a WordPress blog similar to this one – and you don’t need a bit of internet experience to accomplish this. This walk-through will guide you through the process and if you follow step-by-step, you might just be amazed how easy it is. Warning: blogging can be addictive.

In the BlueHost account web page (CPanel login), there should be a category titled Software / Services as shown in the picture (if you don’t have BlueHost webhosting click here to sign up or learn more). Find this Software / Services section and click on the Fantastico De Luxe icon.

This is the Fantastico screen on Bluehost. You can see that it includes more than just WordPress – you can also install Joomla, or Drupal, or even some Wikis & web forums that aren’t in the screen shot. Click WordPress on the left, and it will bring up the screen on the right. Then click New Installation and you are well on your way.

Setting up Options for Install
- Install on Domain: This is the name of the domain you want to put your website on – your own dot com (or net or info). One free domain comes with an annual hosting plan, additional ones can be added on for $10 a year.
- Install in Directory: Even if you just have one domain name, you could set up multiple WordPress blogs. Specify a directory name here, and the software will be installed there. ie: http://yourdomain.com/blog
- Admin Username: Think of a secure administrator login, write it down, and keep it confidential. This will be your user name to log in to your website so you can make any changes or new pages.
- Admin Password: Select a secure password, too. People will try to hijack your website and if you pick an easily guessed password like 12345 then you’re really just encouraging them 😉

Website Options and Blog by Email
- 5. Admin Nickname: This is your publicly displayed name. It can be easily changed later, but try to think of something personable.
- 6. Admin Email: This is an email account you would like to be contacted at in case you have notifications set to email.
- 7. Site Name: This is the publicly displayed name of your website. It is displayed prominently at the heading (in most templates) and can also be changed later.
- 8. Description: This is a short catch-phrase or tag-line for your website. Think of it like a slogan.
Blogging by Email (optional set up)
I’ve never personally used this personally but it might be worth setting up if you often use public computers and would like to save some of your drafts from email form or even publish full web page posts on the go. If you want to skip the blog by email feature, you can enter random information for these fields and continue the basic WordPress installation.
- 9. Email account name: The login information for the email account you want to use.
- 10. Email password: Password for said account.
- 11. POP/SMTP Server: This is the name of an email server your email is transferred on. ex: mail.domain.com (You will need to check your personal mail settings! If you want to skip this step, simply enter mail.domain.com)
- 12. POP/SMTP Server Port: This is the port number associated with your mail account and email server. Again, enter a random number like 10 or 110 if you want to skip this feature.
OK! When These 12 fields are complete (and you’ve written down your login and username) just hit “Install WordPress” at the bottom of the screen.
That’s it! Get Blogging!
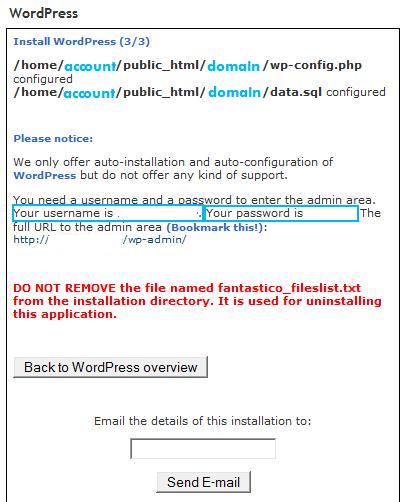
On the final confirmation screen, you’ll see an input field for email. Write in your personal email account, hit “Send E-mail” and you will get a copy of your installation information including your user login and password.
This screen also has a link to the admin area of your WordPress installation. As they suggest, bookmark it. You can also leave the Meta section of your sidebars active and have a clickable link from any page on your site. If you disable it, you’ll need to type the admin URL manually or return to the link in Fantastico if you’ve forgotten.
I’ve recently started a blog, the information you provide on this site has helped me tremendously. Thank you for all.
I agree, this is a great way to get started. It’s almost ridiculous how easy this is to setup. This is just the building blocks to learning more about blogging and website creation as it gets you really interested and curious. As soon as these steps were complete, there’s something that comes over you and all you want to do is learn more and get better at creating websites, it’s rather exciting. Great tutorial and easy step by step explanations, people should take advantage of your post and set things up.